


1.Product Introduction
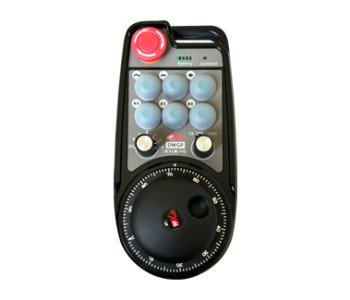
Wireless electronic handwheel is used for manual guidance, positioning, tool setting and
other operations of CNC machine tools. This product adopts wireless transmission technology,
eliminating the traditional spring wire connection, reducing equipment failures caused by cables,
eliminating the disadvantages of cable dragging, oil stains, etc., and is more convenient to
operate. It is widely used in CNC machine tools such as gantry machining centers, gantry
vertical lathes, CNC gear processing machines, and can be adapted to a variety of CNC
systems on the market, such as Siemens, Mitsubishi, Fanuc, syntec and other CNC system
brands.
2.Product features
1. Adopt 433MHZ wireless communication technology, wireless operation distance is 80 meters;
2. Adopt automatic frequency hopping function, use 32 sets of wireless remote controllers at the
same time without affecting each other;
3. Support emergency stop button, and after the handwheel is turned off, the emergency stop
button is still valid;
4. Support 6 custom buttons, switch IO signal output;
5. Support 6-axis control, 7-12 axis control can be customized;
6. Supports 1X,10X, 100X control and can be maximum customizable 1000X;
7. Supports the enable button function, output switch l0 sianals. axis selection,maanification
and encoder.;
8. Support axis selection and magnification selection encoder output;
9. Support standard Type-C charging, 5V-2A charging specification, built-in battery specification
14500/1100mAh.
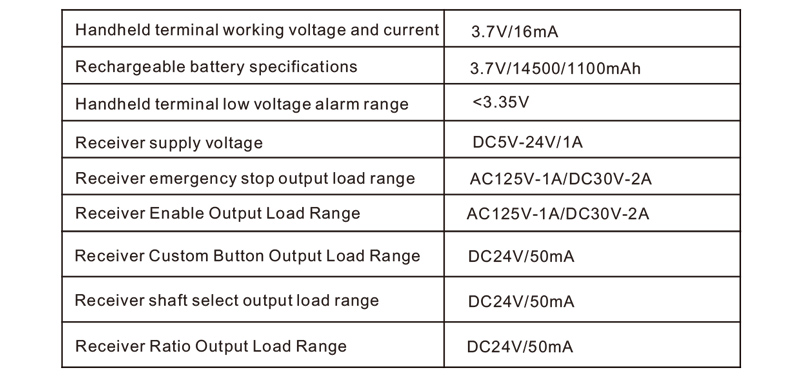
3.Product specifications

4.Product function introduction
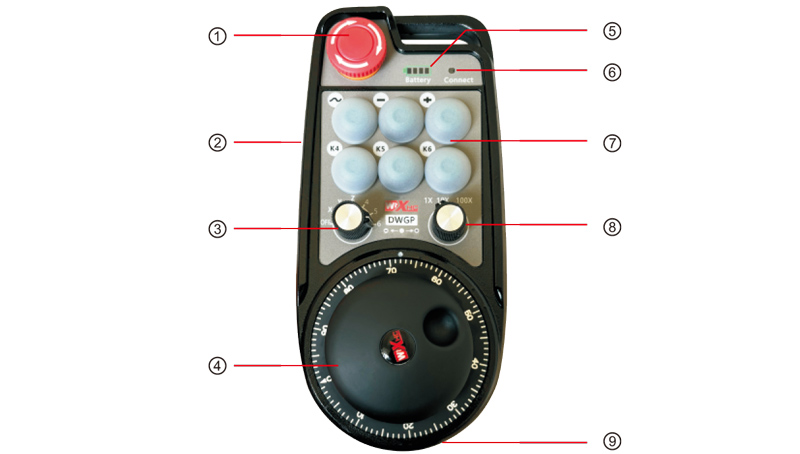
Notes:
①Emergency stop button:
When the emergency stop button is pressed, the two emergency stop IO outputs on
the receiver are disconnected, and all handwheel functions are invalid. When the emergency
stop is released, the emergency stop IO output on the receiver is closed, and all handwheel
functions are restored; and after the handwheel is turned off, the emergency stop IO output
of the receiver is still valid when the emergency stop button is pressed.
②Enable button:
Press any one of the enable buttons on both sides, and the two groups of enable IO
outputs on the receiver will be turned on. Release the enable button and the enable IO
output will be turned off. In addition, you need to press and hold the enable button before
switching the axis selection ratio and shaking the handwheel. This function can be
canceled through the configuration software.
③Axis selection switch (power switch):
Press and hold the enable button and switch the axis selection switch to switch the
moving axis controlled by the handwheel. Switch this switch from OFF to any axis and
turn on the handwheel power.
④Pulse encoder:
Press and hold the enable button and shake the pulse encoder to send out a pulse
signal to control the movement of the machine axis.
⑤Battery indicator:
The hand wheel power display, all bright means full power, all off means it is not
turned on or has no power, the first left grid flashes, indicating that the power is too low,
please charge in time.
⑥Signal Lights:
If the signal light is on, it means the handwheel is being operated and the signal is
normal; if the signal light is off, it means there is no operation, or it is being operated but
the wireless signal is not connected.
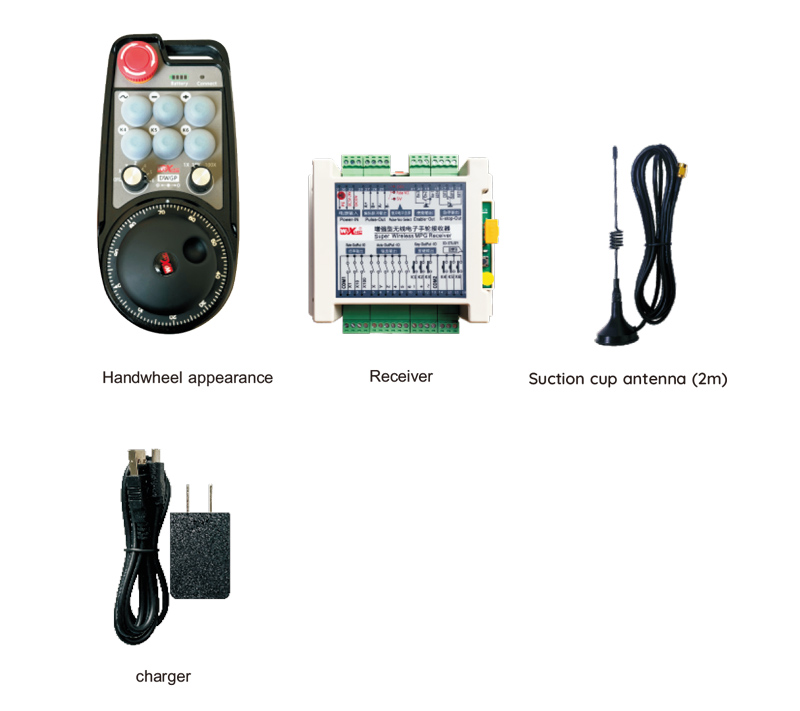
5.Product accessories diagram
6.Product Installation Guide
6.1 Product Installation Steps
1. Install the receiver in the electrical cabinet using the clips on the back, or install it in
the electrical cabinet using the screw holes at the four corners of the receiver.
2.Refer to our receiver wiring diagram, compare it with your on-site equipment, and connect
the equipment to the receiver via cables.
3.After the receiver is fixed, the antenna equipped with the receiver must be connected,
and the outer end of the antenna must be installed or placed outside the electrical cabinet. It
is recommended to place it on the top of the electrical cabinet for the best signal effect. It is
forbidden to leave the antenna unconnected or place the antenna inside the electrical cabinet,
which may cause the signal to be unusable.
4. Finally, turn on the handwheel power switch and you can operate the machine by
handwheel remote control.
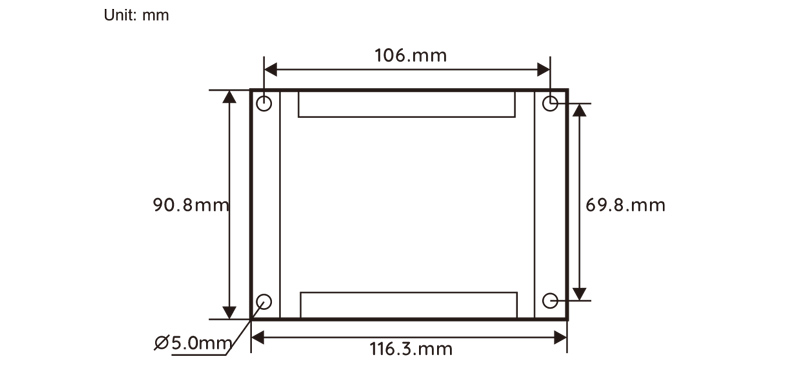
6.2 Receiver installation dimensions
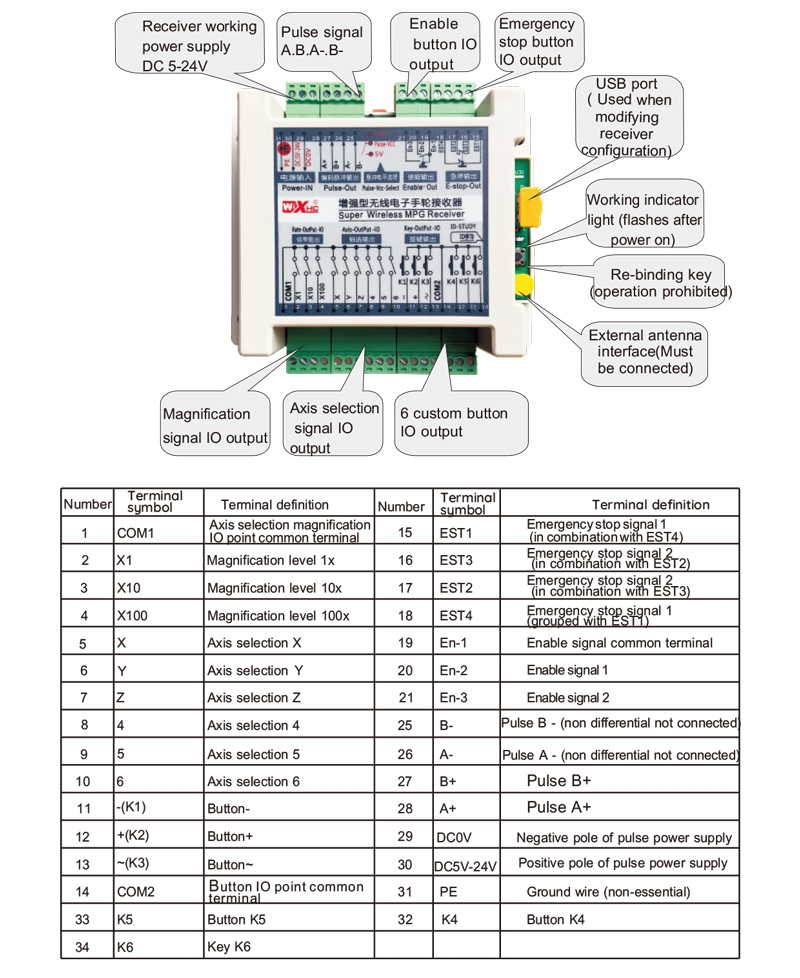
6.3 Receiver Wiring Reference Diagram
7.Product Operation Instructions
1. The machine is powered on, the receiver is powered on, the receiver working indicator
light flashes, the wireless electronic handwheel has the battery installed, the battery cover
is fastened, the wireless electronic handwheel power switch is turned on, and the
handwheel power light is on;
2. Select the coordinate axis: Press and hold the enable button, switch the axis selection
switch, and select the axis you want to operate on;
3. Select magnification: Press and hold the enable button, switch the magnification switch,
and select the magnification level you need;
4. Moving axis: Press and hold the enable button, select the axis selection switch, select
the magnification switch, and then rotatethe pulse encoder to rotate the positive moving axis
clockwise and the negative moving axis counterclockwise;
5. Press and hold any custom button, and the corresponding button IO output of the
receiver will be turned on. Release the button to turn off the output;
6. Press the emergency stop button, the corresponding emergency stop IO output of the
receiver is disconnected, the handwheel function is disabled, release the emergency stop
button, the emergency stop IO output is closed, and the handwheel function is restored;
7. If the handwheel is not operated for a period of time, it will automatically enter sleep
mode to reduce power consumption. When it is used again, the handwheel can be
activated by pressing the enable button;
8. If the handwheel is not used for a long time,it is recommended to switch the handwheel
shaft to the OFF position, turn off the handwheel power, and extend the battery life.
8.Product Model Description

① :DWGP represents the appearance style
② :Pulse output parameters:
01: Indicates that the pulse output signals are A and B, and the pulse voltage is 5V; Pulse
quantity 100PPR;
02: Indicates that the pulse output signals are A and B, and the pulse voltage is 12V; Pulse
quantity 25PPR;
03: Indicates that the pulse output signal is A B、A-、B-; Pulse voltage 5V; Pulse quantity 1
00PPR;
04: Indicates a low-level NPN open circuit output, with pulse output signals of A and B; the
number of pulses is 100PPR;05: Indicates high-level PNP source output, pulse output signals
are A and B; pulse quantity is 100PPR;
③ : represents the number of axis selection switches, 6 represents 6 axis, 7 represents 7 axis.
④ : represents the type of axis selection switch signal, A represents point-to-point output signal,
B represents encoded output signal;
⑤ : represents the type of magnification switch signal,
A represents point-to-point output signal, B represents encoded output signal;
⑥ : represents the number of custom buttons, 6 represents 6 custom buttons;
⑦ : represents the power supply for the system handwheel, 05 represents 5V power supply,
and 24 represents 24V power supply.
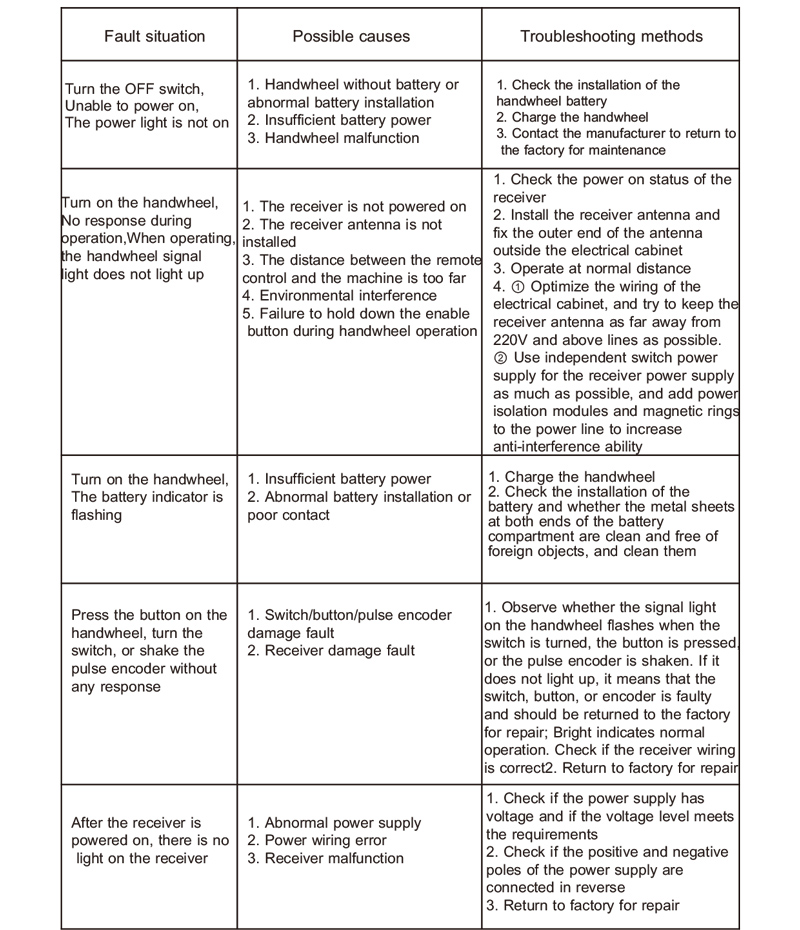
9.Product Troubleshooting
10. Maintenance and care
1. Please use it in a dry environment at room temperature and pressure to extend its service life;
2. Please avoid using in abnormal environments such as rain and water bubbles to extend the service life;
3. Please keep the appearance of the handwheel clean to extend its service life;
4. Please avoid squeezing, falling, bumping, etc. to prevent damage to the precision components inside
the handwheel or accuracy errors;
5. If not used for a long time, please store the handwheel in a clean and safe place;
6.During storage and transportation, attention should be paid to moisture and shock resistance.
11.Safety Information
1. Please read the instructions carefully before use and prohibit non professionals from operating;
2. When the battery level is too low, please charge it in time to avoid errors caused by insufficient
battery and inability to operate the handwheel;
3. If repair is required, please contact the manufacturer. If the damage is caused by self repair, the manufacturer will not provide warranty.